The Knobs Are Calling: Drumstation V2 Lands in the Rack!

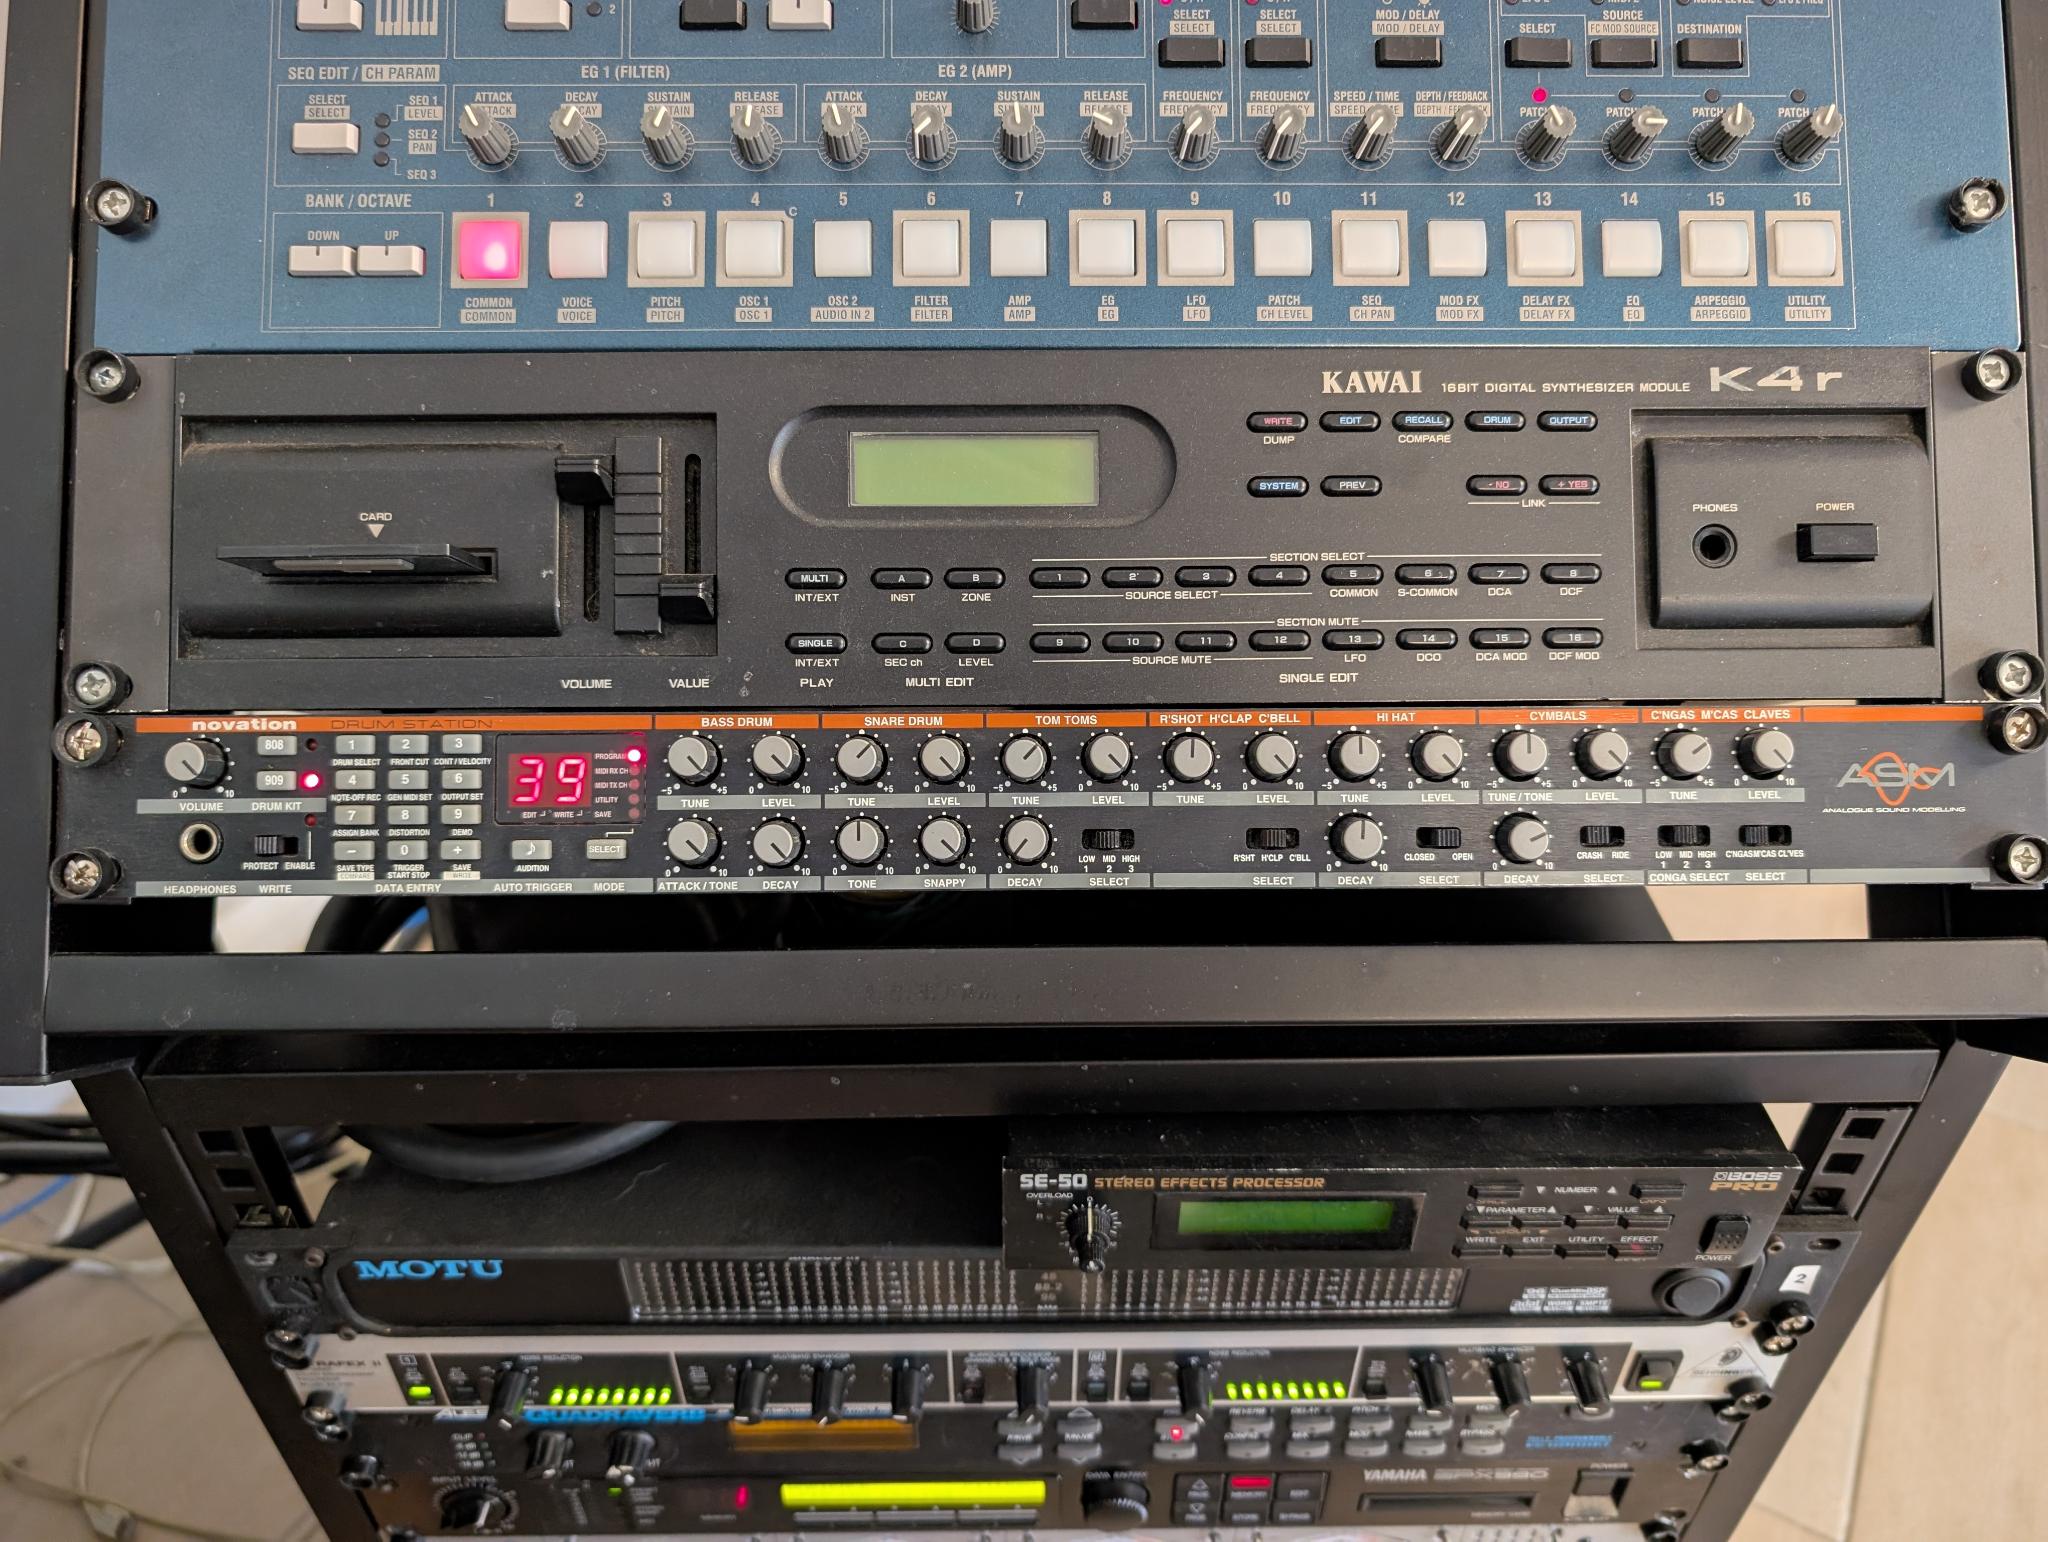
Fresh off the truck and settled into the rack is the Novation Drumstation V2. Yeah, I finally splashed out! I’ve been wrestling with plugins for my drum sounds—and you know how much I love finding a good hardware piece, especially one that nails those classic sounds (like tracking down the vintage Technics amp).

The big draw, of course, is that analog feel. Everyone knows that getting those punchy, real sounds is tough, especially since most commercial tracks these days are ridiculously loud and bright.

Tackling the 909 Legacy

The reason anyone buys a Drumstation is simple: they want that Roland TR-909 sound without having to sell a kidney just to afford an original unit. The 909 is a legend, the heartbeat of house and techno music. It’s infamous for its hybrid architecture—the kick, snare, and toms were analog synthesis, but the hi-hats and cymbals were 6-bit samples. That combination gave it that specific aggressive punch and bright sizzle.

The Drumstation V2 doesn’t use samples; it uses Novation’s Analog Sound Modelling (ASM) technology. This is key: it recreates the circuitry of the original drums using digital signal processing (DSP), which means you get that synthetic 909 kick drum that’s legendary for its powerful decay and ability to clip beautifully.

The Technical Lowdown: V2 vs. The Original

The V2 version supposedly fixed a lot of the subtle MIDI timing issues and velocity control problems that plagued the original Drumstation. But does it truly compare to the real deal?

Where the Drumstation shines is the kick drum and the bass elements (kick, snare, toms) because the ASM accurately models the analog synthesis parts of the 909. You get dedicated knobs for tuning, decay, and tone, mimicking the physical controls of the original machine, letting you tweak that massive kick right into the mixer.

However, replicating those raw, crunchy 6-bit sampled hi-hats and cymbals of the original 909 digitally is always the sticking point. While the Drumstation V2 attempts to model the characteristics of the 909’s sample playback section, sometimes you lose that raw, slightly dirty sonic character—the kind of grit I was trying to preserve when I remade that classic techno track, ‘Psycho Green’. I found myself constantly needing to knock the top off sounds back then to make them sound less “2011” and more “1993”. The Drumstation V2 generally offers cleaner sound reproduction than the vintage hardware.

For my studio, running everything into Cubase, having those iconic sounds available instantly via MIDI, without the maintenance headache of a broken vintage synth (like my Juno-106 fiasco) is a massive win. This thing is going to deliver some seriously huge sounds for my next batch of tracks!

Expect some noise soon, folks. This is going to be stella!

The Knobs Are Calling: New Hardware Lands in the Studio!

My newest toy is the Korg MS2000R, the rackmount version of the Korg MS2000 synthesiser, and I’m already buzzing with excitement. Finding it was a stroke of local luck. I picked it up from LoFi Music in Gosford—if you’re on the Central Coast and looking for excellent vintage gear, seriously check them out. It’s always satisfying to support a local supplier who understands quality hardware.

I already love working with Korg gear, especially my Korg Kronos 2, and I know the MS-20 heritage well from messing around with the software version in the Korg Legacy Collection. But nothing beats the real thing, especially when you need true, hands-on, tactile control.

That’s what this MS2000R delivers in spades! For those tech heads out there, this beauty is a virtual analogue synth known for its huge sound. It typically features four-voice polyphony and combines powerful analogue modelling oscillators with Korg’s classic filter types, including the self-oscillating filters found in the original MS-20. It boasts 16 step-sequence patterns, a deep modulation matrix, and, crucially, a dedicated knob for virtually every major parameter. This level of physical interface is exactly what you need when you’re laying down sounds in Cubase.

After spending so much time tweaking parameters digitally, having all those analogue knobs right there is a dream come true. The joy of sweeping a filter or adjusting the LFO rate on the fly, without staring at a screen, brings back the raw, creative energy of early production work. This thing is going to be perfect for cranking out those high N-R-G tracks for a rave set.

Expect some seriously huge sounds coming out of the studio soon, folks. This is going to be stella!

The New Beast Has Landed

The New Beast Has Landed: Why the Kurzweil K2500X is the Final Piece of the Studio Puzzle!
Whaaaa! It’s been far too long since I’ve had some proper news about new gear gracing the studio, but let me tell you, this latest acquisition is going to change the game entirely. Fresh off the truck and settled into its spot is the monumental Kurzweil K2500X! This thing is an absolute beast, and I’m buzzing with excitement to see how it integrates with the rest of my setup, especially after putting in all the work building out a dedicated production space.

If you know anything about classic synthesis and workstations, you know the pedigree of Kurzweil, and the K2500X is legendary. It’s famed for its incredible V.A.S.T. (Variable Architecture Synthesis Technology) engine, which allows for programming sounds with a depth and complexity that few other machines can touch. Forget simple samples; this is about deep sonic manipulation. The onboard effects and expansive routing capabilities mean I can use it not just as a killer sound source for new tracks, but as a brain for processing some of my other outboard synths, like my Kawai K4r (now happily firmware-updated, thank goodness). Seriously, the creative possibilities are endless. This level of power and flexibility is exactly what you need when you’re laying down sounds in Cubase.

I finally have a full 88-key, fully weighted monster sitting permanently in the studio!

Seriously, the struggle is real when you’re constantly having to pack down and set up controllers, or rely on smaller keyboards for serious piano work. Since building out the studio, the goal has always been to have reliable, accessible gear that encourages creativity, rather than being a mood killer due to technical hiccups, like the issues I used to have with my old audio interface dropping out. Having a full-sized, permanently installed, weighted keyboard means no more fiddling with stands or cables, and definitely no more packing it down and setting it up all the time. It is ready to rock 24/7.

This K2500X isn’t just an addition; it’s a cornerstone. Whether I’m building high N-R-G tracks for a rave set, mixing an epic stream for the Sydney Rave History crew, or just practicing those keyboard parts for the band, having this level of tactile control combined with the sheer sound engine power is going to elevate everything I produce. I already love the feel of quality hardware, from my Korg Kronos 2 to my MOTU interfaces, and this Kurzweil fits right into that mindset of quality and depth.
Expect some seriously huge sounds coming out of the studio soon, folks. This is going to be stella!

Scored some gear

Recently I’d had a lot of trouble with my Focusrite Sapphire 56 audio interface, it would just stop and not produce any sound requiring that I going into the Mixer Interface and disconnect ti and reconnect in order to get it to work. Sometimes this would work sometimes it would not, and even if it did work there was no guarantee that it would continue to work trouble free. It could be 5 hours or 5 minutes and the problem would re-occur, needless to say this was becoming very irritating and was really a mood killer when it can to writing tracks, as a result I had not done a great deal lately.

So I was browsing ebay, looking for alternative audio interfaces. MOTU, Mark Of the Unicorn, was one of the interfaces I was searching on. I had heard of them from years ago but had never given them much through, but to be honest right now none of the interfaces currently on the market worked for me, there seems to be a strong lean towards 2 channel units designed for singer-song writer types that just want to record their guitar and microphone or run a few tracks out of a DAW. I need something more so I can feed all in all my outboard gear and get so good analog warmth, I looked into MOTU and it seemed like a good solution.

What I found was awesome. A studio was selling some of their old gear. thb, most of it was e-waste, piles of old PCI cards, old harddrives, mac books, and PPC G5 Macs, but hiding in the treasure trove where 4 MOTU rack units. By themselves the interfaces are useless, but what I discovered was that I could purchase a separate MOTU 424e PCIe card and bring them back to life. So after a little more investigation that’s what I did.

All up the pile of gear cost me $100AUS and to import that card from the US was $600AUS, but as a result I now have and audio system that is capable of 24 Analog in and 24 Analog out, 4x ADAT lines and 2x AES/EBU lines. Double what I had available on the Focusrite interface, and the software supports Windows 11 properly and does not constantly drop stop. As for the other stuff, well I’ve now thrown out all the old software, I have a box ready to go to the e-waste, I’ve actually used 2 of the G5’s and given one away (more on that later)… and I sold one… for $100, so the MOTO interfaces cost me nothing!

Raspberry Pi in a PlayStation Case

So this is a little toy that I have made, it’s a Raspberry Pi in a Playstation One box, the video explains it all. This project was inspired by Johnathon Denmarks project over at Petrock. If you want to do this yourself and have PS controllers you will also need to get the game_con_gpio working for Retro Pi. It was fun, and it also gave me an excuse to finally buy a new Dremal tool…. Enjoy the video…


K4r Firmware Update

So I own a Kawai K4r. I bought it off a guy on the internet from the US back in the early 90’s, this was way before anything like ebay or Gumtree existed and the transaction relied on me having complete faith in the seller and sending him a money order and hoping that he fulfilled his end of the deal and actually sent the thing to me! Well luckily he did and I now have a great synth. But, there has always been problems with it, mainly when using the filter in fast sweeps the sound would get choppy and clicky, I had read that this is due to a software problem but had been unable to find the necessary firmware to do the upgrade. So after some desperation I emailed Kawai in the US;

I am after a firmware upgrade for my Kawai k4 serial number 297547.
I would like OS version 1.4, P207C.  I can do the upgrade myself. Can
you supply the ROM file or advise where I can download it from ?

… and low-and-behold I got a reply. Juan Escobar from Kawai sent me the firmware directly, you legend!  So without further delay I programmed it up.

IMG_8039

I already own a decent eprom program so it was just a matter of finding which eproms to use, and since I didn’t really want to mess with classic eproms because they are painfully slow I went on the hunt for a pin compatible replacement for the 27c256 that is used in the K4r. I found that the 27SF512 is a perfect EEPROM replacement, I also changed the battery while had it opened. The rom upgrade has brought this thing to life! it’s like I have a new synth, now I can filter sweep as much as I like and there are no noises! If you need to ROM image just send me a message….

EDIT: I’ve had so many requests for the firwmare that I will now put a link right here:  P207C_K4r  If anyone has any problems with me distributing this LET ME KNOW IMMEDIATELY!!

Rode Videomic Pro

So I’ve splashed out and bought myself a Rode Videomic Pro. In what has turned out to be a vain attempt to fix the audio quality of recording made with my SLR. Don’t get me wrong, using this mic is better than using the built in mic, but generally speaking ‘top’ mics on cameras are never very good. I recently used it in a video production more-or-less as a guide recording, the sound that I ended up using came from my Zoom which was one hundered times better! But it was handy to have the sound from the top mic to help sync everything up. But what was real niffty and helped integrate things was installing Magic Lantern onto mt 550D, this gives a recording level meter tool to show the record level, most excellent and a much needed improvement for the camera.

video mic pro

Lots of new toys!

Where to start! There is heaps of stuff happening in the studio at the moment; installation of UAD Pre-amp, upgrade to a UAD Quad, designing and building a new patch bay, getting some gear repaired, fixing and upgrading some gear myself, oh and a new DJ mixer…. Too much to write up in this one post but I will try write up detailed stories as each thing happens. The first major thing that should happen is the removal of the Yamaha 03d and the installation of a new patch bay which will be connected to my new UAD 4-710d, I’ve decided that having a mixer in the studio these days is almost pointless as everything is connected to the computer and is either mixed in the box or I simply use plugins. This will be an interesting exercise since I have always had a mixer in the studio and never really had the need for a patch bay since everything has been directly connected. Hopefully this configuration will give me much more flexibility and a heap more space on the bench!